Git 브랜치 사용하기
- 명령어 한 번에 실행 : 명령어 && 명령어
- 파일 생성 : touch 파일명
- 파일 삭제 : rm 파일명
touch 파일명
git add .
git commit -m "커밋메시지"
rm 파일명
touch 파일명2
git add .
git commit -m "커밋메시지2"
git log  //확인
https://learngitbranching.js.org/?locale=ko
Learn Git Branching
An interactive Git visualization tool to educate and challenge!
learngitbranching.js.org
- 브랜치 생성 : git branch 브랜치명
- 브랜치 확인 : git branch
- 브랜치 이동(선택) : git checkout 브랜치명
- 브랜치 생성&선택 : git checkout -b 브랜치명
- 브랜치 삭제 : git branch -D 브랜치명
- 브랜치 병합 : git merge 브랜치명 (-m "메시지")
- 브랜치 작업 합치기 : git rebase 브랜치명
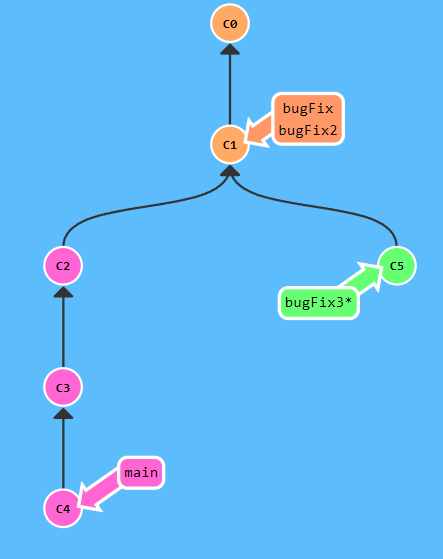
git branch bugFix
git branch bugFix2
git branch bugFix3
git commit
git commit
git commit
git checkout bugFix3
git commit
실제 깃에서 실행할 때↓
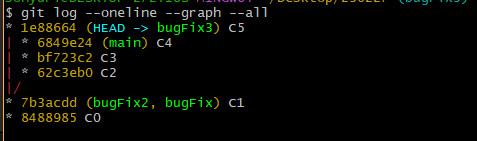
git init
touch 1
git add .
git commit -m "C0"
touch 2
git add .
git commit -m "C1"
git branch bugFix
git branch bugFix2
git branch bugFix3
touch 3
git add .
git commit -m "C2"
touch 4
git add .
git commit -m "C3"
touch 5
git add .
git commit -m "C4"
git checkout bugFix3
touch 6
git add .
git commit -m "C5"
git log --oneline --graph -all  //확인
** 터미널에서 복사 붙여넣기 하는 법
- 복사 : Ctrl + Insert
- 붙여넣기 : Shift + Insert
Char
public class Main {
    public static void main(String[] args) {
        System.out.println((int)'가');
        System.out.println((int)'.');
        System.out.println((int)' ');
        System.out.println(isHangul('하')); //true
    }

    static boolean isHangul(char c){
        return c >= '가' && c <= '힣';
    }
}
String과 char의 차이점
public class Main {
    public static void main(String[] args) {
        String s = "하";
        char c = '하';
    }
}
String은 엄연히 객체이다. c에는 '하'가 저장되지만 s에는 "하"가 저장되는 것이 아닌 주소값이 저장된다.
public class Main {
    public static void main(String[] args) {
        String s1 = "하";
        s1 += "하";

        String s2 = "하하";
        System.out.println(s1 == s2);  //false => 서로 다른 객체
        System.out.println(s1.equals(s2));  //true => 내용은 똑같다
    }
}
일반 변수의 값을 비교할 때는 == 을 쓰고, 객체를 비교할 때는 equals 를 쓰면 된다.
String의 == 연산
Person p1 = new Person(13);
Person p2 = new Person(13);
System.out.println(p1 == p2);  //false

String s1 = "하하";
String s2 = "하하";
System.out.println(s1 == s2);  //true
String은 같은 내용인 경우 기존 객체를 재활용하기 때문에 == 연산의 결과 true가 나온다.
String s3 = new String("하하");
String s4 = new String("하하");
System.out.println(s3 == s4);
각각 new String으로 생성하면 false가 나온다. (내용이 같기 때문에 equals 연산은 true가 나옴)
String의 불변성
String s1 = "가";
String s2 = "가";
System.out.println(s1.hashCode());  //44032
System.out.println(s2.hashCode());  //44032
s1 += "나";
System.out.println(s1.hashCode());  //1410200
System.out.println(s2.hashCode());  //44032
s1 += "나" 를 하면 s1 객체의 내용이 변경되는 것이 아닌 새 객체를 만들어서 가리킨다.
StringBuilder 를 사용하면 객체를 새로 생성하는 것이 아닌, 객체의 내용을 변경한다.
(StringBuffer는 사용x)
toString
public class Main {
    public static void main(String[] args) {
        Person p1 = new Person("yuri", 30);
        System.out.println(p1);  // yuri, 30
    }
}

class Person {
    String name;
    int age;
    Person(String name, int age){
        this.name = name;
        this.age = age;
    }

    public String toString(){
        return name + ", " + age;
    }
}
equals
public class Main {
    public static void main(String[] args) {
        Person p1 = new Person("yuri", 30);
        Person p2 = new Person("yuri", 30);
        System.out.println(p1.equals(p2));  //true
    }
}

class Person {
    String name;
    int age;
    Person(String name, int age){
        this.name = name;
        this.age = age;
    }

    public boolean equals(Object o){
        if(o instanceof Person == false) return false;
        Person other = (Person)o;
        if(name.equals(other.name) && age == other.age) return true;
        return false;
    }
}
기존 equals 메서드의 오버라이딩이기 때문에 매개변수로 Person을 받는 것이 아닌 Object를 받는다.
래퍼 클래스
- 기본 타입 : byte, short, int , long, float, double, char, boolean, void
- 래퍼 클래스 : Byte, Short, Integer, Long, Float, Double, Character, Boolean, Void
- 박싱 : 기본 타입에서 래퍼 클래스 객체로
- 언박싱 : 래퍼 클래스 객체에서 기본 타입으로
int i = 10;
Integer iObj = i;  //오토박싱
System.out.println(iObj + 10);  //오토언박싱
static
public class Main {
    public static void main(String[] args) {
        Print.print1("안녕");
        // Print.print2("안녕");
    }
}

class Print{
    static void print1(String s){
        System.out.println(s);
    }

    void print2(String s){
        System.out.println(s);
    }
}
print2는 new로 객체를 생성해야 한다. -> new Print().print2("안녕");
static은 본사 직원(1명 뿐), non static은 대리점 직원(0명일 수도 100명일 수도...)이라고 생각하면 쉽다.
===> static 메서드는 static 속성만 사용 가능하다.
제네릭
public class Main {
    public static void main(String[] args) {
        Storage<Integer> s = new Storage<>();
        s.setData(5);
        System.out.println(s.getData());

    }
}

class Storage<T> {
    T data;
    T getData(){
        return (T)data;
    }

    void setData(T data){
        this.data = data;
    }
}
scanner와 System.in
import java.util.InputMismatchException;
import java.util.Scanner;

public class Main {
    public static void main(String[] args) {
        Scanner sc = new Scanner(System.in);

        int input = 0;

        while (true) {
            System.out.printf("숫자 : ");
            try {
                input = sc.nextInt();
                sc.nextLine();  // 버퍼를 비운다.
                break;
            }
            catch ( InputMismatchException e ) {
                sc.nextLine(); // 버퍼를 비운다.
                System.out.println("숫자를 입력해주세요.");
            }
        }
        System.out.printf("입력된 숫자 : %d\n", input);
        sc.close();
    }
}
'프로젝트 & TIL > 일별 공부 기록 (백엔드 스쿨)' 카테고리의 다른 글
| 8일차 - json 파일 생성과 읽기 & 자바 기초 (0) | 2023.03.02 |
|---|---|
| 7일차 - 깃 병합과 자바(컬렉션 프레임워크(리스트, 맵)) (0) | 2023.02.28 |
| 5일차 - 자바 생성자 (0) | 2023.02.24 |
| 4일차 - TDD와 자바의 기본(2) (0) | 2023.02.23 |
| 3일차 - 자바의 기본 (0) | 2023.02.22 |


